Choosing the Right Fabric
Selecting the right fabric for your rocking chair cover is crucial for both comfort and durability. The fabric should be strong enough to withstand the wear and tear of frequent use, yet soft and comfortable to sit on. It should also be aesthetically pleasing and complement the style of your chair and room.
Fabric Options and Their Characteristics
The following table summarizes the advantages and disadvantages of different fabric options for rocking chair covers:
| Fabric | Durability | Breathability | Ease of Cleaning | Price | Other Characteristics |
|---|---|---|---|---|---|
| Cotton | Moderate | Good | Easy | Affordable | Soft, natural, versatile |
| Linen | High | Excellent | Moderate | Moderate | Durable, breathable, wrinkle-resistant |
| Velvet | Moderate | Poor | Difficult | Expensive | Luxurious, soft, elegant |
| Synthetic Materials (Polyester, Microfiber) | High | Moderate | Easy | Affordable | Water-resistant, stain-resistant, easy to care for |
Factors to Consider When Choosing Fabric
Here are some key factors to consider when selecting the right fabric for your rocking chair cover:
* Durability: Choose a fabric that can withstand the wear and tear of frequent use, especially if you have children or pets. Linen and synthetic materials are generally more durable than cotton or velvet.
* Comfort: The fabric should be soft and comfortable to sit on. Cotton and velvet are known for their softness, while linen is also comfortable and breathable.
* Aesthetics: The fabric should complement the style of your chair and room. Consider the color, pattern, and texture of the fabric.
* Ease of Cleaning: Choose a fabric that is easy to clean, especially if you have children or pets. Synthetic materials are generally easier to clean than natural fabrics.
* Price: Fabric prices vary widely. Consider your budget and choose a fabric that fits your needs and financial constraints.
Choosing the Right Fabric for Your Needs
By considering the factors discussed above, you can choose a fabric that is both durable and comfortable, and that complements the style of your rocking chair and room.
Measuring and Cutting the Fabric
How to make a rocking chair cover – Now that you’ve chosen the perfect fabric for your rocking chair cover, it’s time to measure and cut it. Accurate measurements are essential for a well-fitting and beautiful cover. This section will guide you through the process, ensuring you have all the necessary pieces to complete your project.
Measuring the Rocking Chair
The first step is to accurately measure your rocking chair. This will determine the exact dimensions of the fabric needed for your cover. Take your time and make sure your measurements are precise. You’ll need to measure the following:
- Seat Width: Measure the widest part of the seat, excluding any armrests.
- Seat Depth: Measure the distance from the front edge of the seat to the back.
- Seat Height: Measure the distance from the floor to the top of the seat.
- Back Height: Measure the distance from the top of the seat to the top of the back.
- Back Width: Measure the width of the back, excluding any armrests.
- Armrest Length: If your chair has armrests, measure the length of each armrest.
- Armrest Width: Measure the width of each armrest.
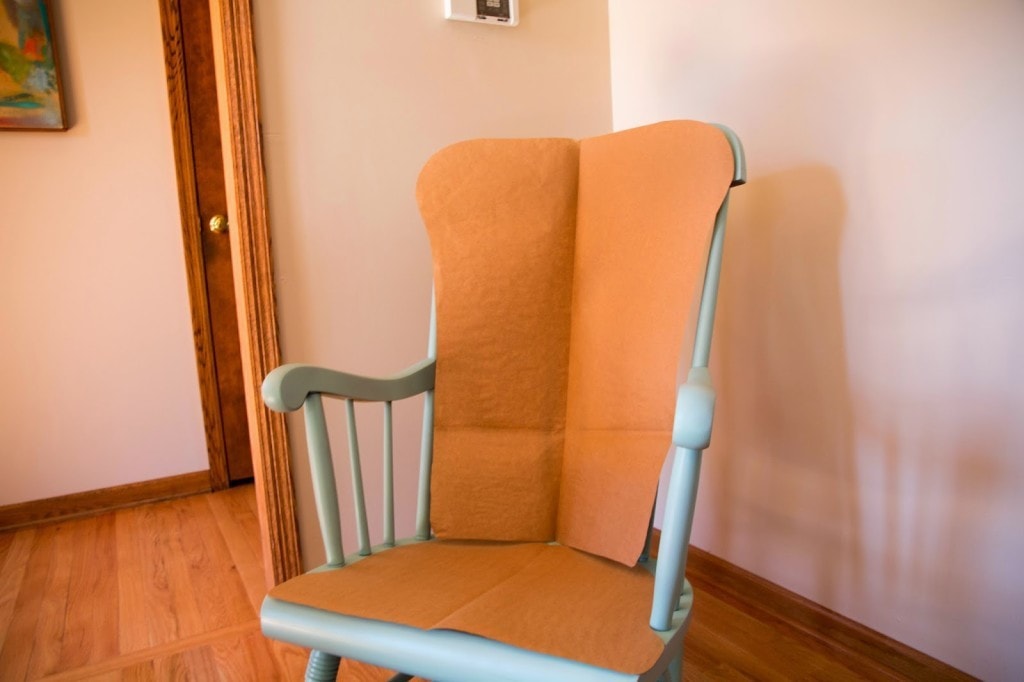
Cutting the Fabric
Once you have your measurements, you can start cutting the fabric. Use a sharp pair of fabric scissors or a rotary cutter for precise cuts. A cutting mat will also help protect your work surface.
Here’s a visual representation of the cutting process:
Example: Imagine you are making a cover for a simple rocking chair with a rectangular seat and a single piece of fabric. You would need to cut the fabric into two large rectangles. One rectangle would be for the seat and back, while the other would be for the bottom of the chair. You would also need to cut out smaller pieces for the armrests (if applicable).
Sewing the Rocking Chair Cover: How To Make A Rocking Chair Cover

Now that you have your fabric cut and ready, it’s time to start sewing! This step involves carefully stitching the pieces together to create a complete cover for your rocking chair.
Sewing the Seat
The seat is the foundation of your rocking chair cover. To ensure a comfortable and secure fit, follow these steps:
- Pin and Stitch the Seat Pieces: Place the two seat fabric pieces right sides together. Pin them along the edges, leaving a 1/2 inch seam allowance. Stitch the pieces together using a straight stitch.
- Turn and Press: Turn the seat cover right side out. Press the seams flat to create a crisp and professional finish.
- Attach the Seat to the Chair Frame: This step involves securing the seat fabric to the chair frame. You can use a variety of methods, including:
- Staple Gun: This method is quick and easy. Simply staple the fabric to the underside of the chair frame.
- Sewing Machine: For a more durable and professional finish, you can sew the fabric to the chair frame using a heavy-duty sewing machine.
- Fabric Glue: A strong fabric glue can be used to adhere the fabric to the chair frame.
Sewing the Back
The back of the rocking chair cover provides support and adds to the overall aesthetic.
- Pin and Stitch the Back Pieces: Similar to the seat, pin and stitch the two back fabric pieces right sides together, leaving a 1/2 inch seam allowance.
- Turn and Press: Turn the back cover right side out and press the seams flat.
- Attaching the Back to the Chair Frame: Use the same method you used for the seat to attach the back to the chair frame.
Sewing the Arms, How to make a rocking chair cover
The arms of the rocking chair cover add comfort and complete the overall look.
- Pin and Stitch the Arm Pieces: Pin and stitch the two arm fabric pieces right sides together, leaving a 1/2 inch seam allowance.
- Turn and Press: Turn the arm covers right side out and press the seams flat.
- Attaching the Arms to the Chair Frame: Use the same method you used for the seat and back to attach the arms to the chair frame.
Finishing Touches
To achieve a professional-looking finish, consider these tips:
- Reinforce Seams: For extra durability, reinforce the seams of your rocking chair cover with a zig-zag stitch or a serger.
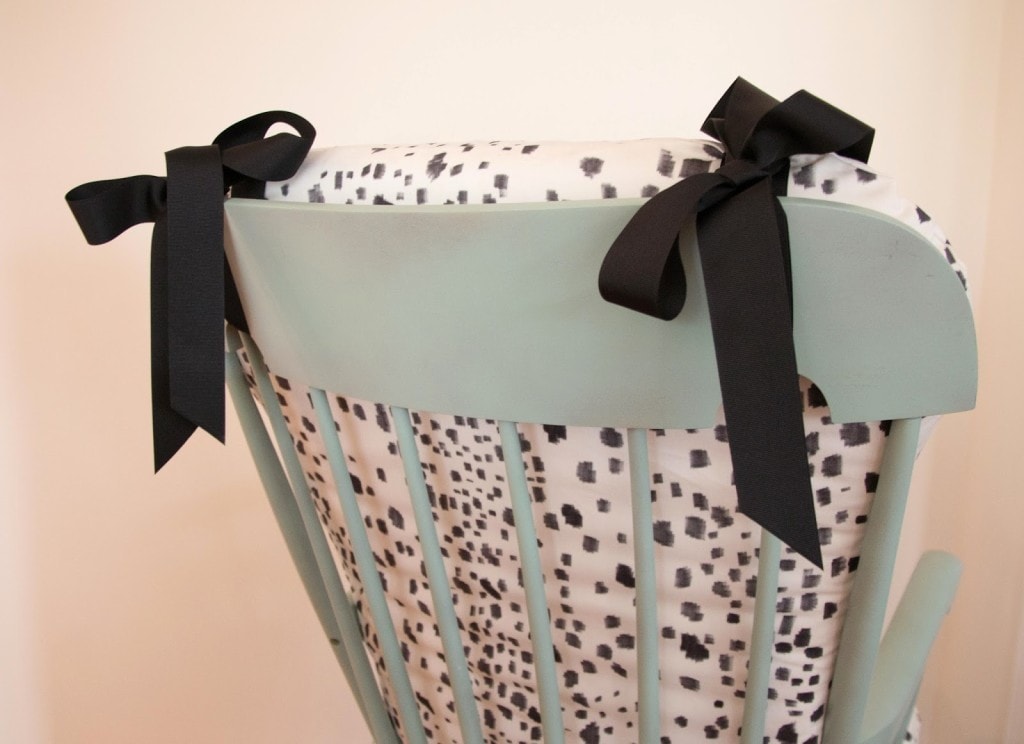
- Add a Decorative Edge: Enhance the look of your cover by adding a decorative edge, such as a bias tape or a contrasting fabric trim.
- Clean Finish: Trim any excess fabric and press all seams for a neat and tidy finish.
A rocking chair cover can be a great way to personalize your space and protect your furniture, but before you get started, you might want to consider the sound your chair makes. If it’s a glider rocking chair, chances are you’ve encountered the dreaded squeak.
Check out this guide on glider rocking chair squeaks to silence those annoying noises before you start sewing your cover. Once you’ve addressed any squeaking issues, you can confidently move forward with your rocking chair cover project.
Making a rocking chair cover is a great way to personalize your space and protect your furniture. But what about those little ones who need a little extra comfort? A baby rocker and vibrating chair can be a lifesaver for parents, and a cozy cover can add a touch of warmth and style to their calming haven.
Just like with a rocking chair, a soft, washable cover can help keep your baby’s rocker looking its best for years to come.
